1. Overview
1.1. BunHMI Display
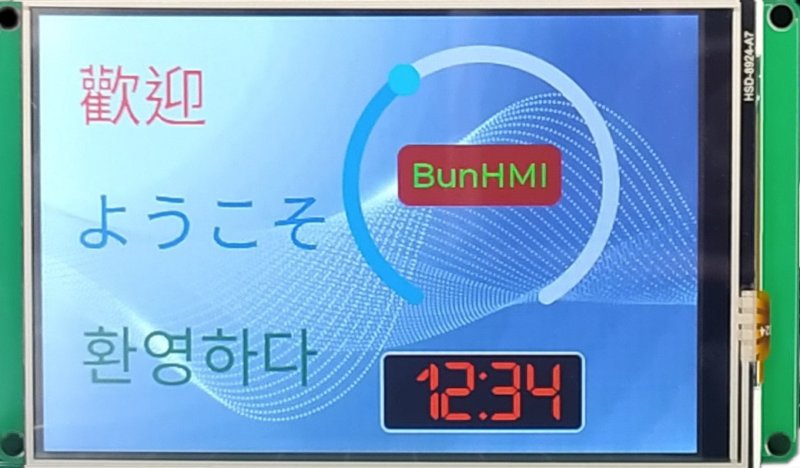
A BunHMI display is shown in Figure 1. It is based on LVGL and uses BunTalk to interact with GUI widgets. It provides an easy way to create GUI applications—quick, simple, and versatile, just like delicious buns.
1.2. The Host Device
BunHMI communicates with the host via UART, requiring only two signals (Tx, Rx). Any host with a UART interface can communicate with BunHMI.
|
Warning
|
The voltage level of BunHMI UART is 3.3V. It is compatible with 5V TTL interface devices but not with 5V CMOS devices. |
|
Warning
|
Do not connect BunHMI to an RS-232 interface. This will cause irreversible damage to the BunHMI display. |
The host device can be an Arduino board (Figure 2), an MCU, or even a PC via USB-UART (TTL), which can easily interact with BunHMI.
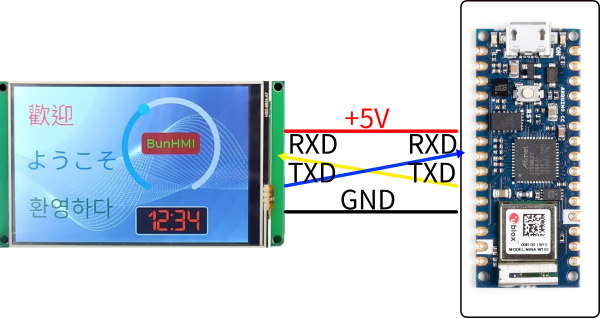
You must cross the Tx and Rx signals between the host and the BunHMI display:
-
Host UART Tx → BunHMI Rx
-
Host UART Rx ← BunHMI Tx
The default UART baud rate for BunHMI is 115200/8n1. You can change the UART baud rate in the Project Config section of BunMaker.
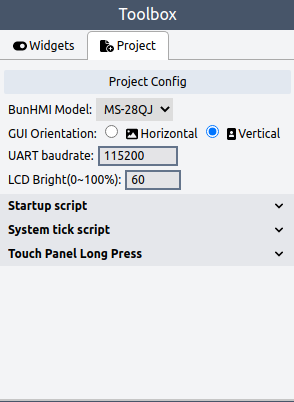
2. BunMaker
BunMaker (Figure 3) is a GUI design application built on the LVGL library. BunMaker facilitates the creation of LVGL layouts.

2.1. Widget Naming Rules
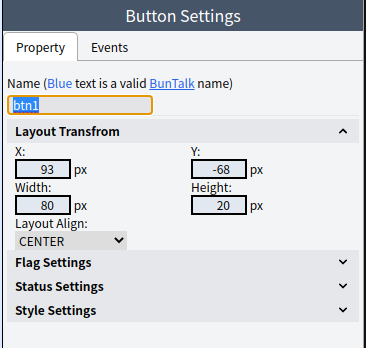
BunTalk scripts use widget names to interact with widgets. The Widget Settings Panel (Figure 4) on the right side of BunMaker allows you to set widget names.
Similar to most programming conventions, widget names must follow specific rules. A valid widget name must:
-
Start with a character: _, a-z, or A-Z.
-
Contain only the following characters: _, a-z, A-Z, or 0-9.
For example, you can set a button’s property using a BunTalk script as follows:
btn1.width(100); // Set the width of btn1 to 100px2.2. Name Scope
In BunTalk, the system object "sys" is a global object that is always accessible. Other objects, such as screens and widgets created in BunMaker, can be accessed by their names.
- Screens
-
Screens are always accessible and can be referenced by their names at any time.
- Widget Names
-
Widget names are only valid when their corresponding screen is loaded.
You can create multiple screens in a single project. For example:
| Screen Name | Widget Names |
|---|---|
Screen1 |
|
Screen2 |
|
You can load a screen using the sys.scr() method:
sys.scr(Screen1);  // Load Screen1
// or
sys.scr(Screen2, 1, 200); // Load Screen2 with animation type 1 and duration of 200ms
When Screen1 is loaded, you can access the following widgets by their names:
-
btn1
-
btn2
-
lab1
For example:
btn1.x(100); // Set the x position of btn1
lab1.text("Hello"); // Set the text of lab1 to "Hello"
When Screen2 is loaded, you can access the following widgets by their names:
-
btn1
-
btn2
-
img1
-
arc2
Note that btn1 in Screen1 and Screen2 refers to different objects, depending on which screen is loaded. Additionally, you cannot access img1 when Screen2 is not loaded. Ensure the correct screen is loaded before accessing its widgets.
A valid widget name must be unique within the same screen.
|
Tip
|
You can use an invalid widget name, such as "~background", if you do not intend to interact with that widget. Invalid names do not need to be unique within the same screen. |
2.3. Widget Events
When interacting with the GUI, events are often of interest to trigger responses. BunHMI is based on the LVGL library, and you can write BunTalk scripts to handle LVGL events.
Here are the LVGL events:
-
EVENT_CLICKED - Triggered when an object is pressed briefly and then released. Not called if scrolled.
-
EVENT_PRESSED - Triggered when an object is pressed.
-
EVENT_LONG_PRESSED - Triggered when an object is pressed for an extended period.
-
EVENT_LONG_PRESSED_REPEAT - Triggered repeatedly after a long press, at intervals defined by long_press_repeat_time. Not called if scrolled.
-
EVENT_FOCUSED - Triggered when an object gains focus.
-
EVENT_DEFOCUSED - Triggered when an object loses focus.
-
EVENT_VALUE_CHANGED - Triggered when the value of an object changes.
-
EVENT_READY - Triggered when a process is completed.
-
EVENT_CANCEL - Triggered when a process is canceled.
-
EVENT_SCREEN_LOADED - Triggered when a screen is fully loaded, after all animations are completed.
-
EVENT_SCREEN_UNLOADED - Triggered when a screen is fully unloaded, after all animations are completed.
-
EVENT_SCREEN_LOAD_START - Triggered when a screen load starts, after the screen change delay expires.
-
EVENT_SCREEN_UNLOAD_START - Triggered when a screen unload starts, immediately after the event is fired.
In the Widget Settings Panel of BunMaker, you can select the Events page to view events relevant to a widget, as shown in the following figure:
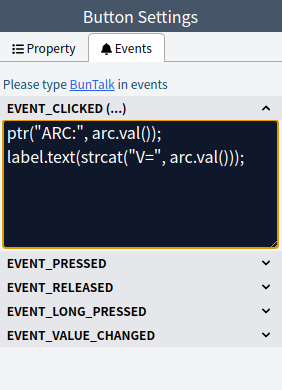
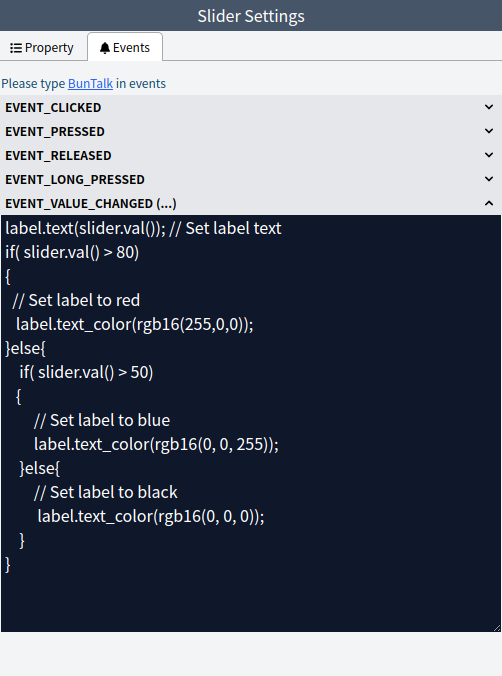
For example, if a widget named "arc" has a value of 33, and a button is clicked, BunHMI will execute the BunTalk script to:
-
Print the string ARC:33 to UART.
-
Concatenate the string V=33 and assign it to the text of a widget named "label."
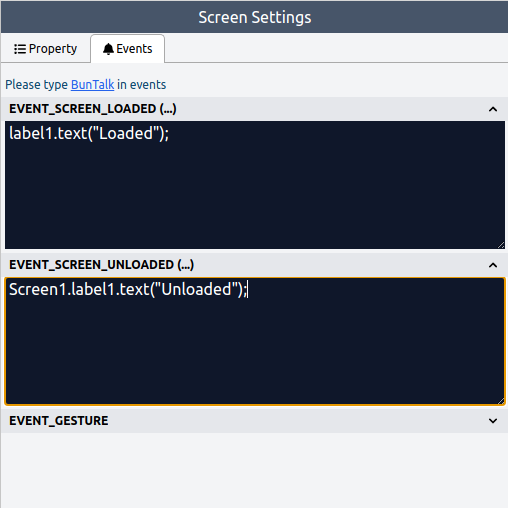
You can also write BunTalk scripts to execute when a screen is loaded, as shown below:
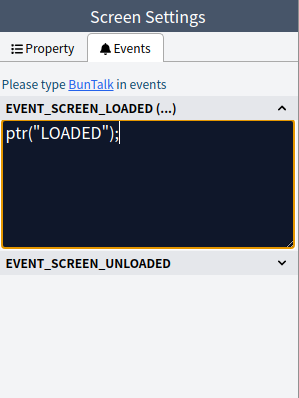
This script sends "LOADED" to UART when the screen is loaded.
Although BunHMI is based on LVGL, not all LVGL events are supported in the BunHMI display. Refer to the Widget Events Panel in BunMaker for a list of supported events.
For detailed event descriptions, refer to the LVGL Events documentation.
2.4. Widget Flags
Widgets have flags that affect their UI behavior. Flag settings are listed in the Widget Settings Panel of BunMaker, as shown in the following image:
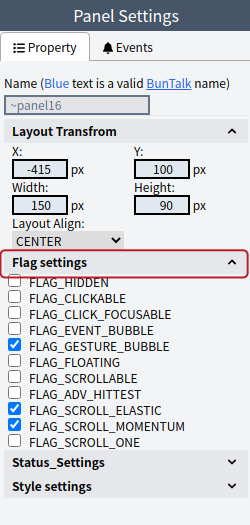
Below is a list of flags and their descriptions. Note that not all flags apply to every widget:
-
FLAG_HIDDEN - Hides the object (as if it does not exist).
-
FLAG_CLICKABLE - Makes the object clickable by input devices.
-
FLAG_CHECKABLE - Toggles the checked state when the object is clicked.
-
FLAG_CLICK_FOCUSABLE - Adds a focused state to the object when clicked.
-
FLAG_SCROLLABLE - Makes the object scrollable.
-
FLAG_SCROLL_ELASTIC - Allows slower scrolling within the object.
-
FLAG_SCROLL_MOMENTUM - Enables the object to scroll further when "thrown."
-
FLAG_SCROLL_ONE - Allows scrolling only one snappable child.
-
FLAG_SCROLL_CHAIN_HOR - Propagates horizontal scrolling to a parent.
-
FLAG_SCROLL_CHAIN_VER - Propagates vertical scrolling to a parent.
-
FLAG_SCROLL_CHAIN - Combines FLAG_SCROLL_CHAIN_HOR and FLAG_SCROLL_CHAIN_VER.
-
FLAG_SCROLL_ON_FOCUS - Automatically scrolls the object into view when focused.
-
FLAG_SCROLL_WITH_ARROW - Allows scrolling the focused object with arrow keys.
-
FLAG_SNAPPABLE - Enables snapping to this object if scroll snap is enabled on the parent.
-
FLAG_EVENT_BUBBLE - Sends all events to the object’s parent. If the parent also has FLAG_EVENT_BUBBLE enabled, the event propagates further up the hierarchy.
-
FLAG_PRESS_LOCK - Keeps the object pressed even if the press slides off the object.
-
FLAG_GESTURE_BUBBLE - Propagates gestures to the parent.
-
FLAG_ADV_HITTEST - Allows more accurate hit (click) testing, e.g., considering rounded corners.
-
FLAG_IGNORE_LAYOUT - Makes the object positionable by layouts.
-
FLAG_FLOATING - Prevents the object from scrolling with the parent and ignores layout.
-
FLAG_OVERFLOW_VISIBLE - Prevents clipping of child content to the parent’s boundary.
2.5. Style Selector
Widget styles can be customized by selecting parts and states.
The style selector is composed of a state and a part combined using the | operator. The default style selector is (LV_STATE_DEFAULT | LV_PART_MAIN).
Here is a list of states and their corresponding code numbers:
-
LV_STATE_DEFAULT = 0x0000
-
LV_STATE_CHECKED = 0x0001
-
LV_STATE_FOCUSED = 0x0002
-
LV_STATE_FOCUS_KEY = 0x0004
-
LV_STATE_EDITED = 0x0008
-
LV_STATE_HOVERED = 0x0010
-
LV_STATE_PRESSED = 0x0020
-
LV_STATE_SCROLLED = 0x0040
-
LV_STATE_DISABLED = 0x0080
Here is a list of parts and their corresponding code numbers:
-
LV_PART_MAIN = 0x000000 /**< A background-like rectangle */
-
LV_PART_SCROLLBAR = 0x010000 /**< The scrollbar(s) */
-
LV_PART_INDICATOR = 0x020000 /**< Indicator, e.g., for sliders, bars, switches, or checkbox tick boxes */
-
LV_PART_KNOB = 0x030000 /**< A handle to adjust values */
-
LV_PART_SELECTED = 0x040000 /**< Indicates the currently selected option or section */
-
LV_PART_ITEMS = 0x050000 /**< Used for widgets with multiple similar elements (e.g., table cells) */
-
LV_PART_TICKS = 0x060000 /**< Ticks on a scale, e.g., for a chart or meter */
-
LV_PART_CURSOR = 0x070000 /**< Marks a specific place, e.g., a text area’s cursor or a chart marker */
The following code demonstrates how to use the style selector:
// Set the background color of the main part of a widget to blue in the default state
// Style selector = (LV_STATE_DEFAULT | LV_PART_MAIN)
widget.bg_color(rgb16(0,0,255));

// Set the background color of the indicator part of a widget to red when focused
// Style selector = (LV_STATE_FOCUSED | LV_PART_INDICATOR)
widget.bg_color(rgb16(255,0,0), 0x0002|0x20000);
3. BunTalk Script
3.1. BunTalk Syntax
BunTalk is a simple scripting language. Each statement must end with a semicolon (";"). For example:
ptr("hello world"); // Prints "hello world" to UART
label.text("Welcome");  // Sets the label text to "Welcome"
3.2. Keywords
BunTalk includes the following keywords:
if, else, and, or
These keywords cannot be used as object (widget/screen) names.
3.3. Arithmetic and Bitwise Operations
BunTalk supports basic arithmetic operations [ + , - , * , / , % ] and parentheses () for grouping.
It also supports bitwise operations [ &, |, ^ ].
ptr(5 + 6); // Prints 11 to UART
ptr((5 + 9) % 10); // Prints 4 to UART
ptr(7 & 3); // Prints 3 to UART
ptr(5 | 2); // Prints 7 to UART
ptr(5 ^ 1); // Prints 4 to UART
ptr(0x10 | 0x100); // Hex numbers start with 0x. This prints 272 to UART.
label.text(bar.val() * 2);  // Sets the label text to the value of bar multiplied by 2
label2.text((bar.val() + bar2.val()) / 2); // Sets label2 text to the average of bar.val() and bar2.val()
3.4. Flow Control and Logical Operations
BunTalk supports flow control and logical operations.
Syntax |
Operation |
! |
Logical NOT |
== |
Equal |
!= |
Not Equal |
> |
Greater Than |
>= |
Greater Than or Equal To |
< |
Less Than |
⇐ |
Less Than or Equal To |
and |
Logical AND |
or |
Logical OR |
// If statement
if (sw.checked()) {
  ptr("checked");
}

// For String type, the if statement checks if the string length > 0
if (label.text()) {
  // Label text length > 0
} else {
  // Label text is an empty string
}

// If-else statement
if (bar.val() > 50) {
  label.hidden(0);  // Show label
  label.text(bar.val()); // Set label text
} else {
  label.hidden(1);  // Hide label
}

// Logical AND and greater-than operation
if (sw.checked() and (slider.val() > 50)) {
  ptr("slider=", slider.val());
}

// Logical OR operation
if (sw.checked() or sw2.checked()) {
  led.color(rgb16(255, 0, 0)); // Set LED color to red
} else {
  led.color(rgb16(0, 255, 0)); // Set LED color to green
}
3.5. BunTalk Datatype
There 3 major data type
-
Number: Integer number. Number start with 0x is hex number. (ie: 0x10 = 16)
-
String: String is surround by double quote " " and is encoded with UTF-8 format.
-
Object: Most objects are widget object, except sys and screen object. Objects are created in BunMaker.
3.6. BunTalk by UART
You can send BunTalk by UART to interact with BunHMI. When host transmit BunTalk by UART, you must add <EOT>(04h) at the end of command string. (<EOT> stand for END OF Transmitssion). And the max BunTalk script length on BunHMI UART buffer is 256 bytes.
When using arduino, you can use Serial.print to send BunTalk to BunHMI. Here is an arduino example
// Method 1:
#define EOT 0x04
char buff[256];
snprintf(buff, sizeof(buff), "ptr(\"Hello\"); bar.val(%d);", val);
Serial1.print(buff);
Serial1.print("lab.text(\"Some Text\");"); // Send more script
Serial1.write(EOT); // Then send EOT at the end.

// Method 2:
snprintf(buff, sizeof(buff), "widget.text(\"CNT:%d\");\x04", test_cnt++); // add \x04 at the end of script
Serial.print(buff);
You can choose either Method 1 or Method 2 which is appropriate.
The BunTalk script widget.text() is to invoke widget’s method, We will talk about widgets and methods at Section 7 later.
When you want receive data from BunHMI, here is the example code of arduino
#define EOT 0x04

// the setup routine runs once when you press reset:
void setup() {
  // initialize serial communication at 115200 bits per second:
  Serial1.begin(115200);
  // Set UART Rx Time out to 10ms
  Serial1.setTimeout(10);
}

// Check and receive data from BunHMI
int rxBunHmiData(char* buff, int buff_len) {
  static char hmiBuff[256];
  static uint8_t hmiBuffLen = 0;

  if (!Serial1.available()) {
    return 0;
  }
  int rxlen = Serial1.readBytes(hmiBuff + hmiBuffLen, sizeof(hmiBuff) - hmiBuffLen);
  int i;
  hmiBuffLen += rxlen;
  // Search EOT token from the end of hmiBuff
  for (i = hmiBuffLen - 1; i >= 0; i--) {
    if (hmiBuff[i] == EOT) {
      // Got EOT Byte
      hmiBuff[i] = 0;  // Replace EOT to NULL (string terminate)
      i++;
      int cmd_len = (i < buff_len) ? i : buff_len;
      // Copy hmiBuff to buff
      memcpy(buff, hmiBuff, cmd_len);
      // Move remain data to the head of hmiBuff
      int remain_len = hmiBuffLen - cmd_len;
      if(remain_len > 0){
        memmove(hmiBuff, hmiBuff+cmd_len, remain_len);
      }
      hmiBuffLen = remain_len;
      return cmd_len;
    }
  }
  return 0;
}

// the loop routine runs over and over again forever:
void loop() {
  char rxbuff[256];
  int rxlen;

  // Check Data from HMI
  rxlen = rxBunHmiData(rxbuff, sizeof(rxbuff));
  if (rxlen) {
    // Handle data from HMI
    // TODO: add handleHmiData(rxbuff);
  }
}
For easy understanding, the following document won’t show <EOT> explicitly.
3.7. BunTalk in BunMaker
You can use BunTalk script in BunMaker too. When use BunTalk in BunMaker, there is no need <EOT> at the end of BunTalk script command.
In BunMaker, there is an Events Panel (Figure 7) in widget settings. You can write BunTalk script in events panel.
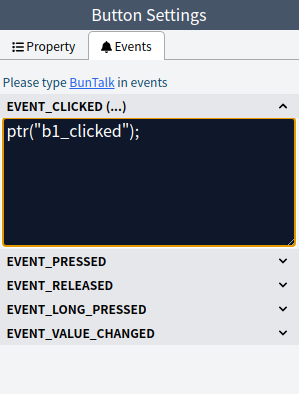
Above settings will print b1_clicked to UART to notify host that Button is clicked.
You can add comments in Events Panel as well. Comments are start with "//" to the end of line, like following figure.
3.8. Error message
When BunTalk script arise some error, It will spit out error message with prefix: !!.
For example, if you send wrong BunTalk message to BunHMI, it will send error message:
-
Run BunTalk: ptr("hello"
-
Get Response: !!Error at end: Expect ')' after arguments.
Also, if BunTalk script in BunMaker arise runtime error, it will spit out error message to UART.
3.9. Event message
When running animation, we can set event trigger when animation is done. BunHMI will send event message with prefix: !^.
For example
-
!^EVT_ANIM_X_END:widget_name
-
!^EVT_ANIM_VAL_END:widget_name
-
!^WAV_PLAY_END
3.10. Color format
BunHMI use RGB565 16bit color format. That is use a 16bit binary code to represent RGB color channel.
-
Red: 5bits, bit[15..11]
-
Green: 6bits, bit[10..5]
-
Blue: 5bits, bit[4..0]
A number will be translated as a 16 bit binary code to represent a RGB565 color code.
4. Global Functions
The following table show globol funtion in BunTalk
| Function | arguments & return | Desc. |
|---|---|---|
atoi(str) |
args: |
atoi() is similar to atoi() function of standard C function. ex: |
ptr(…) |
args: <Number|String>, ptr() accept variable arguments |
ptr() is used to send string to BunHMI UART Tx let host make response by the message. ex: print widget width NOTE: ptr() will add EOT(04h) at the end of string. |
strcat(…) |
args: <Number|String>, strcat() accept variable arguments ex: Set widget text If value of bar is 30, this will set widget’s text to display Note: widget.text() & bar.val() are widget methods that described in Section 7. |
strcat() is used to concatenate args to string. It is used to set widget text mostly. |
rgb16(r,g,b) |
args: ex: Set widget color to red return: Number: Represent RGB565 color format |
This function is used to convert red,green,blue color channel to RGB565 color format |
5. System Methods
The sys object is a global object that can be accessed by its name, sys. For example:
sys.beep(2000, 100); // Triggers the BunHMI onboard beeper.
sys.bright(60); // Sets the LCD backlight to 60%.
sys.scr(scr2); // Changes the screen to scr2.
5.1. Variables
The sys object includes 16 variables (indexed 0~15) for storing temporary data. These variables can hold numbers, strings, or objects. The values are stored in RAM and will reset after a power cycle.
// Writing to a variable
sys.var(0, 11.2); // Assigns a number to variable 0, var[0] = 11.2.
sys.var(1, "test"); // Assigns a string to variable 1, var[1] = "test".
sys.var(2, label); // Assigns an object to variable 2, var[2] = widget.

// Reading from a variable
ptr(sys.var(0));  // Prints 11.2.
ptr(sys.var(1));  // Prints "test".
sys.var(2).text("Hello");  // Sets the label text to "Hello".
5.2. load_str() and save_str()
The load_str() and save_str() methods allow you to save and load string data in non-volatile flash memory. Each slot has a maximum length of 256 bytes. These methods are useful for storing product information or other non-volatile data.
sys.save_str(10, "SN:SKU123465"); // Saves a string at offset 10 bytes in flash memory.
ptr(sys.load_str(10, 12)); // Prints a string from flash memory with an offset of 10 bytes and a length of 12 bytes.
5.3. Message Box
To display a message box, use the sys.mb_show() method as shown below:
sys.mb_show("Test", "This is a test message", "OK", "Cancel"); // Displays a message box.This will display a message box like the following:
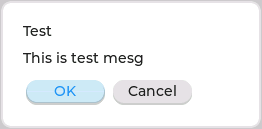
When the user clicks the OK button, the string "OK" is sent to the UART. Similarly, clicking the Cancel button sends the string "Cancel" to the UART.
5.4. Gesture Events
You can detect gesture directions by invoking the sys.gesture() method in the EVENT_GESTURE event.
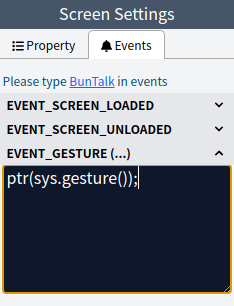
EVENT_GESTUREMost widgets have the default flag FLAG_GESTURE_BUBBLE enabled, which passes gesture events to their parent and prevents them from receiving EVENT_GESTURE.
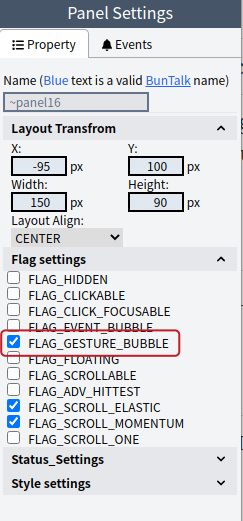
To capture gestures on a widget, disable the FLAG_GESTURE_BUBBLE flag for that widget. If all widgets pass gesture events to their parent, the Screen will eventually receive the gesture event.
5.5. System Tick
The system tick feature allows you to run scripts periodically. You can configure the system tick settings in the Project Settings of the Toolbox.
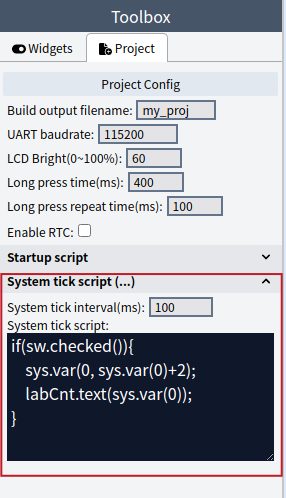
-
System tick interval: Defines the tick interval in milliseconds (ms). The system tick script will run at every tick interval.
Caution: When using system ticks, ensure that the widget name exists on the current display screen. For example, if a widget named "lab1" exists only on Screen1 and is used in a system tick script, switching to Screen2 will cause an error because "lab1" is no longer accessible.
We recommend using Section 6.1 if you need to control widgets for each screen.
5.6. Timer
Timers function similarly to system ticks, allowing you to run scripts periodically. You can dynamically change the script at runtime using the sys.timer() method.
sys.timer(0, 0, 500, 1, "if(sw.checked()){label.text(sys.rtc_str(0));}");This sets a timer to run the following code every 500ms:
if(sw.checked()){label.text(sys.rtc_str(0));}
// Updates the label text to the RTC time every 500ms if the `sw` widget is checked.
To cancel or stop a timer, pass the timer ID without any additional arguments:
sys.timer(0); // Stops timer 0.
sys.timer(2); // Stops timer 2.
5.7. Method List
The following table lists some of the system methods. Additional methods, such as those for SD card and WAV file playback, are described in separate sections.
Method |
Arguments & Return |
Description |
|
Arguments: Return: None |
Triggers the BunHMI onboard beeper to generate a frequency for the specified duration. |
|
Arguments: Return: None |
Sets the LCD backlight brightness. |
|
Arguments: Return: None |
Sets the cursor display. This method works only on HMI models that support mouse devices. |
gesture() |
Arguments: None Return: <Number>, Gesture direction bitmap |
Detects gesture directions. This is often called in
|
load_str(pos, len) |
Arguments: Return: <String>, String read from flash memory. |
Load string from BunHMI non-volatile flash memory. BunHMI proide 256bytes non-volatile memory. To load string from non-volatile memory, you can use load_str() like Read load string
This will print string from non-volatile memory at position 10. with max string length is 50 |
map(value, fromLow, fromHigh, toLow, toHigh) |
Arguments: Return: <Number>, The mapped value. |
Re-maps a number from one range to another. Note that the "lower bounds" of either range may be larger or smaller than the "upper bounds" so the map() function may be used to reverse a range of numbers, for example y = map(x, 1, 50, 50, 1); The function also handles negative numbers well, so that this example y = map(x, 1, 50, 50, -100); is also valid and works well. |
mb_show(title, mesg, btn1, btn2, …) |
Arguments: Return: none |
Show message box
This will display message box with 2 buttons. You can use 1, 2 or 3 buttons, depend on how many arguments you passed. If button is clicked, BunHMI will send button text to UART. ie: if Button OK is clicked, you will get "OK" by UART. And message will disappear, if any button is clicked. |
mb_close() |
Arguments: none Return: none |
Close message box |
rand(max) |
Arguments: Return: <Number>, Random number |
Get random number in range between min~max If only max is provided, the range will be 0~max |
scr(screen) |
Arguments: Return: none |
Load screen |
scr(screen, anim_type, time, delay) |
Arguments: anim_type <Number>:
time: <Number>, time of the animation, in millisecond delay: <Number>, delay before the transition, in millisecond Return: none |
Load screen with animation |
scr() |
Arguments: none Return: <Object>, The current display screen object |
Get current display screen object, please refer [Screen] for more screen methods |
stop_anim() |
Arguments: none Return: none |
Stop all animations. |
save_str(pos, string) |
Arguments: Return: none |
Save string to BunHMI non-volatile flash memory. BunHMI proide 256bytes non-volatile memory. You can use these memory to save some product information like Serial Number or Version Number. To save string to non-volatile flash memory, you can use save_str() like This will save string "12345" to flash memory at offset position 10. |
timer(id, delay, interval, repeat, script) |
Arguments: Return: none |
Set timer to run BunTalk script. There are 8 timers you can use. Use id to select which timer you want to use, and set the delay, interval and repeat to run BunTalk script. timer example
This will set timer0 to run script led.toggle() repeatedly wieh interval 100ms, after 500ms delay. Note: When new screen is loaded, old screen timer will be all stopped. |
timer(id) |
Arguments: Return: none |
Stop timer. Use this method to stop timer. |
touch_en(enable) |
Arguments: enable, <Number> Return: None |
Enable/Disable touch screen function. |
var(id) |
Arguments: Return: <Number|String|Object> |
Read variable slot. |
var(id, val) |
Arguments: Return: none |
Save val to variable slot. |
6. Screen
The Screen object can be obtained using sys.scr(), which returns the currently displayed screen object.
Below are examples of how to use the Screen object:
ptr(sys.scr().name()); // Prints the current screen name
sys.scr().bg_img(1); // Sets the screen background to image ID 1
sys.scr().bg_color(rgb16(255,0,0)); // Sets the screen background to red
6.1. Screen Tick
The screen tick feature allows you to run BunTalk scripts periodically. The script will only execute when the screen is displayed. You can configure the screen tick settings in the Screen Settings panel.
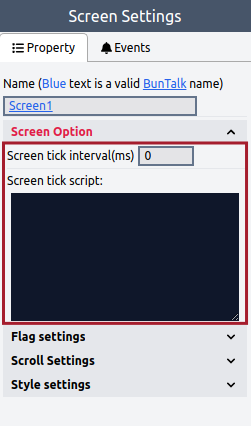
Screen Tick Interval: This value defines the tick interval in milliseconds (ms). The screen tick script will execute at every tick interval.
6.2. Accessing Widgets on Unloaded Screens
For widgets on the currently displayed screen, you can directly access them using their widget names.
However, if the screen is not currently displayed, you must access the widget through the screen property, as shown below:
label1.text("Hello"); // For the currently displayed screen, you can access the widget directly by its name.
Screen1.label1.text("Hello"); // Access the widget via the screen property, regardless of whether the screen is displayed or not.
When you call sys.scr(); to load a new screen, widgets not present on the new screen can only be accessed via the screen property.
This is particularly useful in screen unload events. If you need to access a widget when the screen is unloaded, you can use the screen property to access the widget.
For example, if you have a Screen1 with a label1 widget, you can use label1.text() during EVENT_SCREEN_LOADED because Screen1 is loaded. However, you must use Screen1.label1.text() during EVENT_SCREEN_UNLOADED to access label1, as Screen1 is no longer loaded. Refer to Figure 12 for more details.
6.3. Screen Methods
Method |
Arguments & Return |
Description |
name() |
Arguments: none |
Retrieves the name of the screen. |
bg_img(var) |
Arguments: |
Sets the screen background image. If |
bg_color(var) |
Arguments: |
Sets the background color of the screen. |
font(name) |
Arguments: |
Sets the embedded font for the screen. The embedded fonts include all built-in fonts:
Additionally, all user-added embedded fonts are supported. Example: Set the embedded font for the screen
|
7. Widgets
Widgets are the core components of BunHMI. Each widget has its own methods and properties, which can be controlled using BunTalk scripts. The following sections describe the available widgets and their respective methods.
7.1. Widget Base
Widgets are created using BunMaker. You can call widget methods by referencing the widget name assigned in BunMaker.
For example, btn1.width(): here, btn1 is the widget name, and the width() method returns the width of the widget.
Method |
Arguments & Return |
Description |
bg_color(color, [part=0]) |
Arguments: Return: none. |
Sets the background color of the widget. Example
|
bg_grad_color(color) |
Arguments: Return: none. |
Sets the background gradient color of the widget. |
bg_grad_stop(main, grad) |
Arguments: Return: none. |
Sets the stop position of the main color and the start position of the gradient color in percentage (%). |
bg_grad_dir(dir) |
Arguments: Return: none. |
Sets the direction of the gradient color. |
bg_opa(val) |
Arguments: Return: none. |
Sets the background opacity of the widget. |
clickable(val) |
Arguments: Return: none. |
Enables or disables the widget’s clickable property. |
clickable() |
Arguments: none. Return: <Number>, The clickable status ( |
Retrieves the clickable status of the widget. |
co_x() |
Arguments: none. Return: <Number>, The X position relative to the screen. |
Retrieves the X position of the widget relative to the screen. |
co_y() |
Arguments: none. Return: <Number>, The Y position relative to the screen. |
Retrieves the Y position of the widget relative to the screen. |
disabled(val) |
Arguments: Return: none. |
Enables or disables the widget. |
disabled() |
Arguments: none. Return: <Number>, The disabled status ( |
Retrieves the disabled status of the widget. |
focused(val) |
Arguments: Return: none. |
Sets the focus state of the widget. |
focused() |
Arguments: none. Return: <Number>, The focused status ( |
Retrieves the focus state of the widget. |
font(name) |
Arguments: Return: none. |
Sets the embedded font of the widget. Available fonts include built-in fonts:
Additionally, user-added embedded fonts are supported. Example: Set embedded font
|
height() |
Arguments: none. Return: <Number>, The height of the widget. |
Retrieves the height of the widget. |
height(val) |
Arguments: Return: none. |
Sets the height of the widget. |
hidden(val) |
Arguments: Return: none. |
Shows or hides the widget. |
hidden() |
Arguments: none. Return: <Number>, The hidden status ( |
Retrieves the hidden status of the widget. |
opa(val) |
Arguments: Return: none. |
Sets the opacity of the widget. |
opa() |
Arguments: none. Return: <Number>, The opacity value. |
Retrieves the opacity value of the widget. |
pos(x, y) |
Arguments: Return: none. |
Sets the position of the widget. |
scroll_by(x, y, anim) |
Arguments: Return: none. |
Scrolls the widget to relative position. |
scroll_to(x, y, anim) |
Arguments: Return: none. |
Scrolls the widget to the specified position. |
scroll_to_x(x, anim) |
Arguments: Return: none. |
Scrolls the widget to the specified x position. |
scroll_to_y(y, anim) |
Arguments: Return: none. |
Scrolls the widget to the specified y position. |
size(w, h) |
Arguments: Return: none. |
Sets the size of the widget. |
text_color(val) |
Arguments: Return: none. |
Sets the text color of the widget and its children. |
text_opa(val) |
Arguments: Return: none. |
Sets the text opacity of the widget and its children. |
width() |
Arguments: none. Return: <Number>, The width of the widget. |
Retrieves the width of the widget. |
width(val) |
Arguments: Return: none. |
Sets the width of the widget. |
x(val) |
Arguments: Return: none. |
Sets the X position of the widget. |
x() |
Arguments: none. Return: <Number>, The X position relative to the parent widget. |
Retrieves the X position of the widget relative to its parent. |
y(val) |
Arguments: Return: none. |
Sets the Y position of the widget. |
y() |
Arguments: none. Return: <Number>, The Y position relative to the parent widget. |
Retrieves the Y position of the widget relative to its parent. |
7.1.1. Animation Methods
Animation methods allow dynamic changes to widget properties. The following table demonstrates animations for the x property. Other properties follow a similar approach.
To stop all animations, use:
sys.stop_anim();This stops all animations. When a new screen is loaded, all animations on the previous screen are automatically stopped.
7.2. Arc
The Arc widget inherits all methods from Table 5 and includes the following additional methods:
| Method | Arguments & Return | Description |
|---|---|---|
val(val) |
Arguments: Return: none |
Sets the value of the arc. |
val() |
Arguments: none Return: <Number>, the current value of the arc |
Retrieves the current value of the arc. |
angle(start, end) |
Arguments: Return: none |
Sets the arc’s angle. Zero degrees corresponds to the middle-right position (3 o’clock) of the object, and angles increase in the clockwise direction. |
angle() |
Arguments: none Return: <String>, the start and end angles in the format |
Retrieves the arc’s angle. For example, if the start angle is 120 and the end angle is 60, this method will return the string 120,60. |
bg_angle(start, end) |
Arguments: Return: none |
Sets the background angle of the arc. This method behaves similarly to |
rotation(val) |
Arguments: Return: none |
Sets the rotation angle of the arc. |
range(min, max) |
Arguments: Return: none |
Sets the value range for the arc. |
range() |
Arguments: none Return: <String>, the minimum and maximum range values in the format |
Retrieves the value range of the arc. For example, if the minimum range is 0 and the maximum range is 100, this method will return the string 0,100. |
anim_val |
Reference: |
Animates the widget’s properties. |
7.3. Bar
The Bar widget inherits all methods from Table 5 and includes the following additional methods:
Method |
Arguments & Return |
Description |
val(val, [anim=0]) |
Arguments: Return: none |
Sets the value of the bar. Optionally, animation can be applied. |
val() |
Arguments: none Return: <Number>, the current bar value |
Retrieves the current value of the bar. |
start_val(val) |
Arguments: Return: none |
Sets the start value of the bar. |
start_val() |
Arguments: none Return: <Number>, the current start value |
Retrieves the start value of the bar. |
range(min, max) |
Arguments: Return: none |
Sets the range of values for the bar. |
range() |
Arguments: none Return: <String>, the range in the format |
Retrieves the range of values for the bar as a string. |
anim_val |
Reference: |
Represents the animation-related properties of the widget. |
7.4. Button
The Button widget inherits all methods from the Table 5 class.
7.5. Calendar
The Calendar widget inherits all methods from the Table 5 class, in addition to its own calendar-specific methods.
7.5.1. Get User-Selected Date
You can retrieve the date selected by the user by adding a BunTalk script to the EVENT_VALUE_CHANGED event, as shown below:
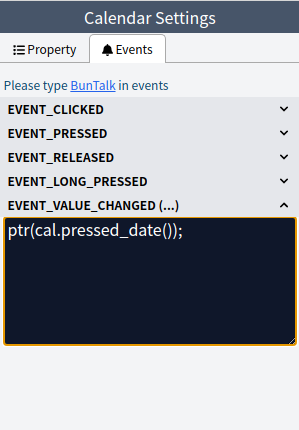
When the user selects a date on the calendar, BunHMI will print the selected date as a string, for example: 2020,12,1.
Method |
Arguments & Return Value |
Description |
today_date(year, month, day) |
Arguments: Return Value: None |
Sets the current date to the specified year, month, and day. |
today_date() |
Arguments: None Return Value: <String>, The current date. |
Retrieves the current date. For example, if today is |
showed_date(year, month) |
Arguments: Return Value: None |
Sets the displayed date to the specified year and month. |
showed_date() |
Arguments: None Return Value: <String>, The displayed year and month. |
Retrieves the year and month currently displayed on the calendar. For example, if the displayed date is |
pressed_date() |
Arguments: None Return Value: <String>, The user-selected date. |
Retrieves the date selected by the user. For example, if the selected date is |
7.6. Chart
The Chart widget inherits all methods from Table 5 and includes additional chart-specific methods.
7.6.1. Chart Types
The chart supports the following types:


7.6.2. Custom X-Axis Labels
For line and bar charts, the default X-axis labels are sequential numbers starting from 0. You can customize the X-axis labels in the chart options.
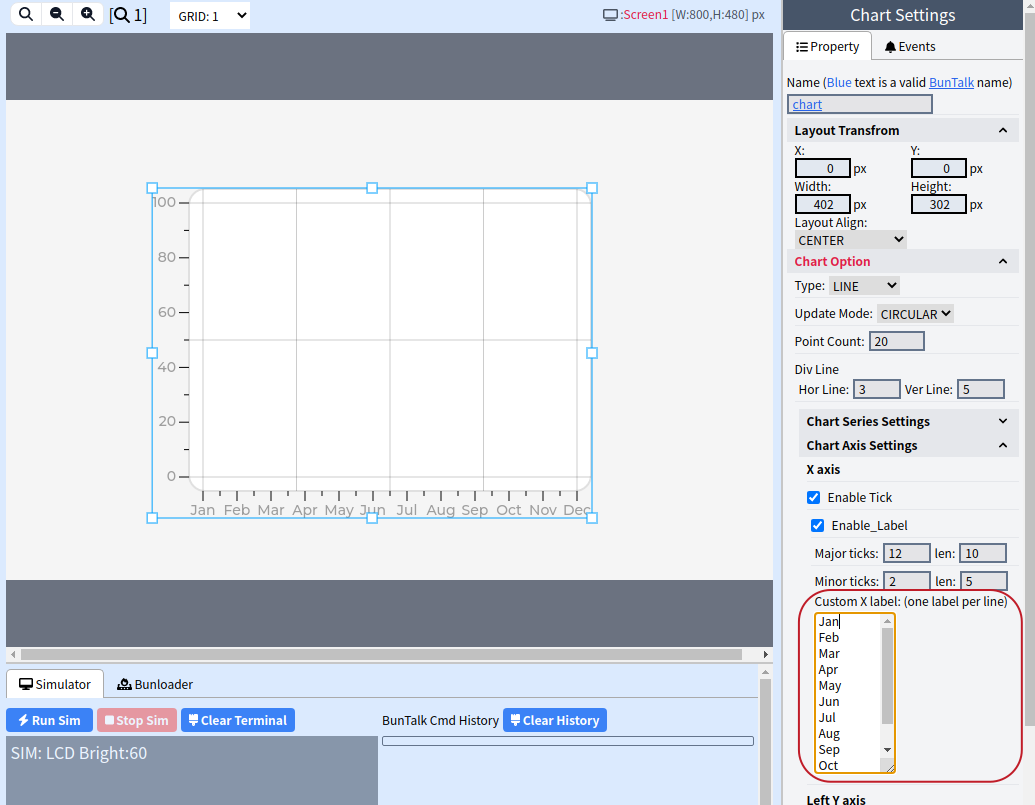
Edit the custom X-axis labels (one label per line) in the X-axis settings.
7.6.3. Line Chart Styles
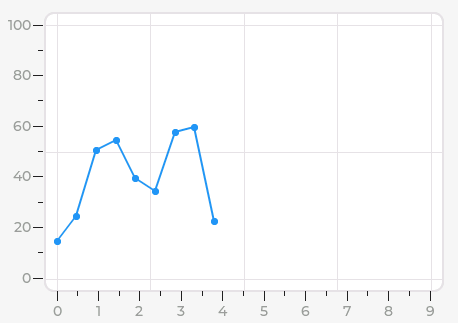
The default line chart appears as shown below:
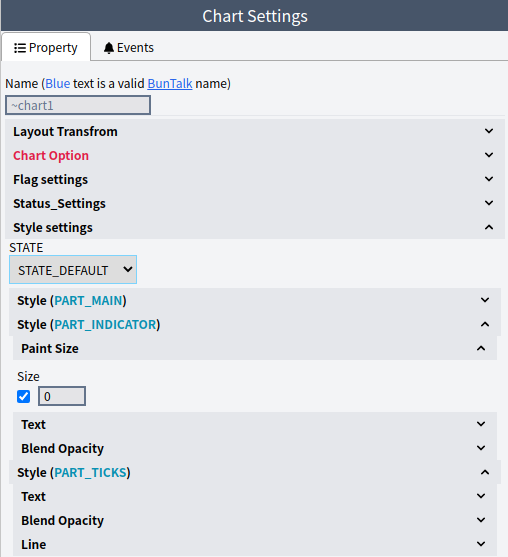
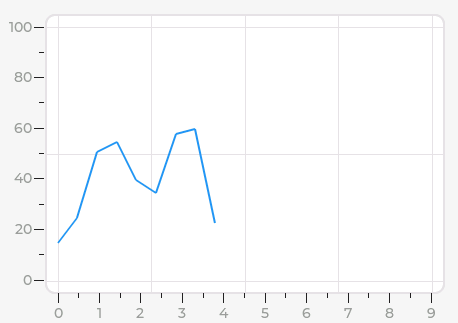
To hide the dots, set the Paint size of PART_INDICATOR to 0.
7.6.4. Modifying Chart Data
Chart data is represented by series, with the first series ID starting at 0. You can modify the data in several ways:
Adding Data Points
Add the next data point to a series and refresh the chart:
chart.next(0, 100); // Add 100 to series 0
chart.mnext(30, 20);  // Add 30 to series 0 and 20 to series 1
chart.next2(0, 10, 20); // For scatter charts, add (x, y) = (10, 20) to series 0
Setting Data Values
Set specific data values by ID or update all data in a series:
chart.set_value(0, 10, 33); // Set series 0, index 10 to 33
chart.set_all(0, 100);  // Set all data in series 0 to 100
Updating Multiple Data Points
For faster updates, set multiple data points and refresh the chart afterward:
chart.ser_i(0, 10); // Select series 0, set update index to 10
chart.ser(10, 11, 12, 13, 14, 15, 16, 17, 18, 19); // Update values (max 10 at a time)
chart.ser(20, 21, 22, 23, 24, 25); // Update additional values
chart.refresh();  // Refresh the chart
This method is useful for displaying a complete chart during screen load.
Resetting Chart Data
To clear or reset a series, use the special value 32767, which represents a "non-point." The chart will skip this value and not render it:
chart.set_all(0, 32767); // Clear data in series 07.6.5. Chart Methods
The following table lists the available chart methods:
| Method | Arguments & Return Values | Description |
|---|---|---|
div_line(hdiv, vdiv) |
Arguments: Return: none |
Sets the number of division lines on the chart. |
get_point_pos(ser, id) |
Arguments: Return: String |
Retrieves the position of a data point. For example, if the point is at x:10, y:30, this method returns 10,30. |
mnext(…) |
Arguments: <Number>, multiple arguments Return: none |
Sets the next value for multiple series. Example: |
next(ser, val) |
Arguments: Return: none |
Adds the next value to a series. |
next2(ser, x_val, y_val) |
Arguments: Return: none |
Adds the next (x, y) values to a series. This method is only applicable to scatter charts. |
point_count(val) |
Arguments: Return: none |
Sets the point count for the chart. |
point_count() |
Arguments: none Return: <Number>, point count |
Retrieves the point count of the chart. |
refresh() |
Arguments: none Return: none |
Forces the chart to refresh. Call this method after using |
ser(val1, val2, …) |
Arguments: Return: none |
Adds values to a series starting at the index set by Example: The data index automatically increments and wraps back to 0 after reaching the end of the data. |
ser_color(ser, color) |
Arguments: Return: none |
Sets the color of a series. |
ser_hide(ser, hide) |
Arguments: Return: none |
Shows or hides a series. |
ser_i(ser, idx) |
Arguments: Return: none |
Sets the data update index for a series. This affects the |
ser2(x1, y1, x2, y2, …) |
Arguments: Return: none |
Adds (x, y) values to a series. This method is only for scatter charts. Example: The data index automatically increments and wraps back to 0 after reaching the end of the data. |
set_all(ser, val) |
Arguments: Return: none |
Sets all data points in a series to the specified value. |
set_value(ser, id, val) |
Arguments: Return: none |
Sets a specific data point in a series. |
set_value2(ser, id, x_val, y_val) |
Arguments: Return: none |
Sets a specific (x, y) data point in a series. This method is only for scatter charts. |
set_range(axis, min, max) |
Arguments: Return: none |
Sets the range of the Y-axis. |
type(type) |
Arguments: Return: none |
Sets the chart type. |
update_mode(mode) |
Arguments: Return: none |
Sets the update mode for the chart. |
x_start(ser, point) |
Arguments: Return: none |
Sets the starting point for the X-axis of a series. |
x_start(ser) |
Arguments: Return: <Number> |
Retrieves the starting point for the X-axis of a series. |
zoom_x(val) |
Arguments: Return: none |
Sets the zoom factor for the X-axis. |
zoom_x() |
Arguments: none Return: <Number>, zoom factor |
Retrieves the zoom factor for the X-axis. |
zoom_y(val) |
Arguments: Return: none |
Sets the zoom factor for the Y-axis. |
zoom_y() |
Arguments: none Return: <Number>, zoom factor |
Retrieves the zoom factor for the Y-axis. |
7.7. Checkbox
The Checkbox widget inherits all methods from Table 5 and provides the following additional methods:
| Method | Arguments & Return Value | Description |
|---|---|---|
text(val) |
Arguments: Returns: none |
Sets the display text of the checkbox. |
text() |
Arguments: none Returns: <String>, the current display text. |
Retrieves the display text of the checkbox. |
checked(val) |
Arguments: Returns: none |
Sets the checkbox’s checked status. |
checked() |
Arguments: none Returns: <Number>, where |
Retrieves the checkbox’s checked status. |
7.8. Drop-down
The drop-down menu is a commonly used UI element.

In this example, we name a drop-down menu as dd and set its options to "9600\n19200\n57600\n115200". This allows the user to select one of these options.

In the event settings panel of the drop-down widget, the following BunTalk script is written for the EVENT_VALUE_CHANGED event:
ptr("You selected:", dd.selected_str()); // Print the selected item string
dd.text(dd.selected_str()); // Set the drop-down to display the selected item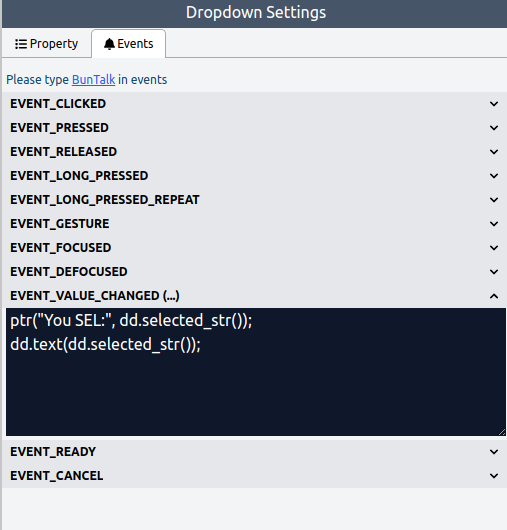
The drop-down widget inherits all methods from Table 5 and includes the following additional methods:
| Method | Arguments & Return | Description |
|---|---|---|
options(str) |
Arguments: Return: None |
Sets the drop-down menu options. |
options() |
Arguments: None Return: <String>, options string |
Retrieves the drop-down menu options as a string. |
add_option(str, pos) |
Arguments: Return: None |
Adds an option to the drop-down menu at the specified position. |
clear_options() |
Arguments: None Return: None |
Clears all options from the drop-down menu. |
selected(pos) |
Arguments: Return: None |
Sets the selected position in the drop-down menu. |
selected() |
Arguments: None Return: <Number>, selected position |
Gets the selected position in the drop-down menu. |
selected_str() |
Arguments: None Return: <String>, selected item string |
Gets the string of the selected item in the drop-down menu. |
text(val) |
Arguments: Return: None |
Sets the display text of the drop-down menu. |
text() |
Arguments: None Return: <String>, display text |
Gets the display text of the drop-down menu. |
dir(val) |
Arguments: Return: None |
Sets the direction in which the drop-down menu pops up. |
dir() |
Arguments: None Return: <Number>, display direction (refer to |
Gets the direction in which the drop-down menu pops up. |
highlight(val) |
Arguments: Return: None |
Enables or disables the highlight status of the drop-down menu. |
highlight() |
Arguments: None Return: <Number>, |
Gets the highlight status of the drop-down menu. |
open() |
Arguments: None Return: None |
Opens the drop-down menu. |
close() |
Arguments: None Return: None |
Closes the drop-down menu. |
is_open() |
Arguments: None Return: <Number>, |
Gets the open status of the drop-down menu. |
option_cnt() |
Arguments: None Return: <Number>, number of options |
Gets the number of options in the drop-down menu. |
7.9. Image
The Image widget inherits all methods from Table 5 and provides additional image-specific methods.
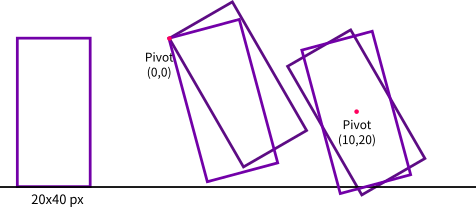
7.9.1. Rotation
The image can be rotated using the angle() method. Before rotating, ensure that the appropriate pivot point is set using the pivot() method. The following example demonstrates image rotation with different pivot points:
7.9.2. Recolor
A color can be blended with every pixel of an image using a specified intensity. This feature is useful for representing different states (e.g., checked, inactive, pressed) of an image without requiring multiple versions of the same image.
The recolor() method sets the color, and the recolor_opa() method adjusts the intensity of the recolor effect. The intensity ranges from 0 (no recolor) to 255 (full recolor). By default, this feature is disabled with a value of 0.
For example, consider the following image:

You can change the image color using the following code:
image.recolor(rgb16(200, 0, 0));
image.recolor_opa(200);
This results in the following:

| Method | Arguments & Return | Description |
|---|---|---|
angle(val) |
Arguments: Return: None |
Sets the rotation angle of the image. |
angle() |
Arguments: None Return: <Number>, Rotation angle |
Gets the current rotation angle of the image. |
zoom(val) |
Arguments: Return: None |
Sets the zoom factor for the image. |
zoom() |
Arguments: None Return: <Number>, Zoom factor |
Gets the current zoom factor of the image. |
src(var) |
Arguments: Return: None |
Sets the image source. If |
offset_x(val) |
Arguments: Return: None |
Sets the horizontal offset for the image display. |
offset_x() |
Arguments: None Return: <Number>, Horizontal offset value |
Gets the horizontal offset of the image display. |
offset_y(val) |
Arguments: Return: None |
Sets the vertical offset for the image display. |
offset_y() |
Arguments: None Return: <Number>, Vertical offset value |
Gets the vertical offset of the image display. |
pivot(x, y) |
Arguments: Return: None |
Sets the pivot point for image rotation. |
pivot() |
Arguments: None Return: <String>, Pivot coordinates in the format "x,y" |
Gets the current pivot point for image rotation. |
recolor(color) |
Arguments: Return: None |
Sets the recolor value for the image. |
recolor_opa(val) |
Arguments: Return: None |
Sets the recolor opacity. A value of 0 disables recoloring, while 255 applies full recoloring. |
anim_angle, anim_play_angle, anim_zoom, anim_play_zoom |
Arguments: Refer to [anim_x] and [anim_play_x] Return: None |
Animates widget properties such as angle and zoom. |
7.10. ImgBtn
The ImgBtn widget inherits all methods from the Table 5 class.
7.11. Keyboard
The Keyboard widget is used to edit text areas. It allows you to type alphabets and digits, and it includes two special keys: CANCEL and READY, which trigger corresponding events.
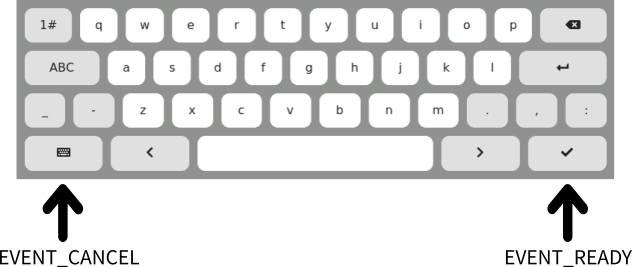
You can write BunTalk scripts in the event handler for these keys when they are pressed.
7.11.1. Keyboard Hint
The keyboard hint is a text message used to indicate which text area is being edited. It is particularly useful in the EVENT_READY event.
For example, consider a screen with two text area widgets named taID1 and taID2, and one keyboard widget named kbd.
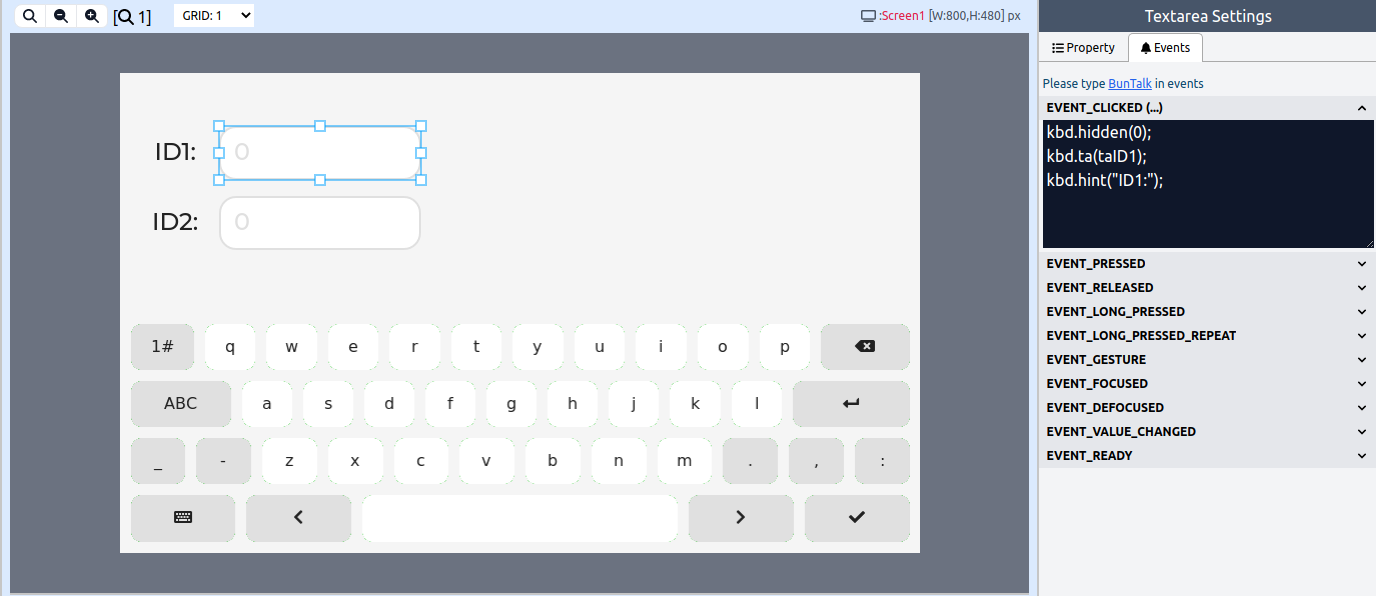
The following script is executed when the taID1 widget triggers the EVENT_CLICKED event:
// On taID1 EVENT_CLICKED
kbd.hidden(0); // Display the keyboard
kbd.ta(taID1); // Set the keyboard target to taID1
kbd.hint("ID1:"); // Set the hint message to "ID1:"
Similarly, the following script is executed when the taID2 widget triggers the EVENT_CLICKED event:
// On taID2 EVENT_CLICKED
kbd.hidden(0); // Display the keyboard
kbd.ta(taID2); // Set the keyboard target to taID2
kbd.hint("ID2:"); // Set the hint message to "ID2:"
When taID1 is clicked, the keyboard hint is set to "ID1:". The same logic applies to taID2.
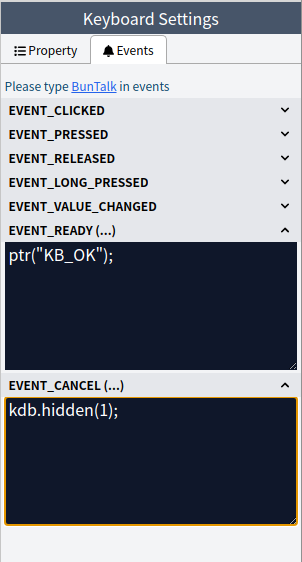
The following script is executed when the kbd widget triggers the EVENT_READY event:
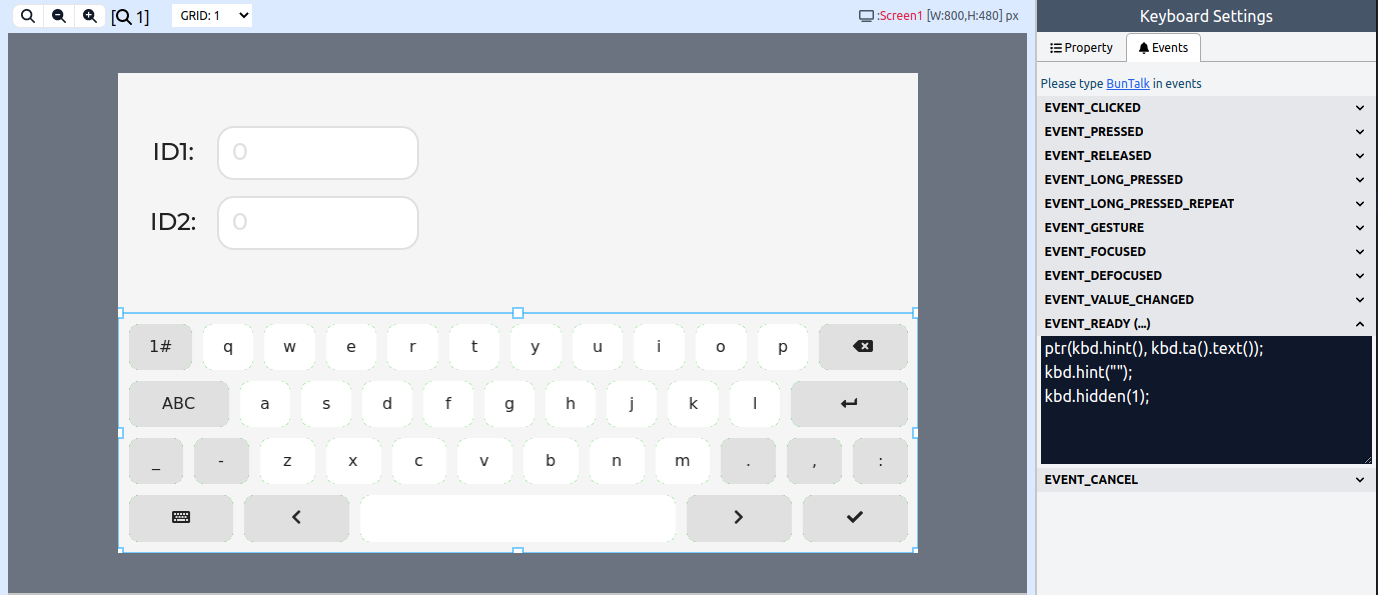
// On kbd EVENT_READY
ptr(kbd.hint(), kbd.ta().text()); // Print the hint message and the text of the target text area
kbd.hint("");   // Clear the hint message
kbd.hidden(1);  // Hide the keyboard
For example, when editing taID1 is complete and the READY button is pressed, the HMI will print:
ID1:<text of taID1>Similarly, for taID2, the HMI will print:
ID2:<text of taID2>By using the hint() method, you can retrieve the text value and identify which text area was edited when the user presses the READY button.
Remember to clear the hint message by calling kbd.hint(""); if it is no longer needed.
The Keyboard widget inherits all methods from Table 5 and provides the following additional methods:
| Method | Arguments & Return | Description |
|---|---|---|
hint(str) |
Arguments: Return: None |
Sets the hint message. The maximum length is 16 bytes. |
hint() |
Arguments: None Return: <String>, the current hint message. |
Retrieves the current hint message of the keyboard. |
mode(val) |
Arguments: Return: None |
Sets the keyboard mode. |
mode() |
Arguments: None Return: <Number>, the current keyboard mode. Refer to the |
Retrieves the current keyboard mode. |
popover(val) |
Arguments: Return: None |
Enables or disables the display of button titles in a popover when pressed. |
popover() |
Arguments: None Return: <Number>, the current popover status. |
Retrieves the current popover status. |
textarea() |
Arguments: None Return: <Object>, the target text area object of the keyboard. |
Retrieves the target text area object of the keyboard. You can print the target text using: [source,js] ---- ptr(keyboard.ta().text()); // Print the text of the target text area ---- |
textarea(obj) |
Arguments: Return: None |
Sets the target text area object of the keyboard. |
ptrkey(prefix, [ctrl_only=0]) |
Arguments: Return: None |
Prints the last key pressed on the keyboard. This is typically used in the EVENT_PRESSED event of the keyboard widget. Normal keys include Control keys are listed below. The printed character may contain more than one character:
When |
7.12. Label
The Label widget inherits all methods from Table 5 and provides the following additional methods:
Method |
Arguments & Return |
Description |
text(val) |
Arguments: Returns: |
Sets the label’s display text or number. |
text() |
Arguments: none Returns: |
Retrieves the label’s display text. |
7.13. LED
The LED widget inherits all methods from Table 5 and provides the following additional methods:
Method |
Arguments & Return |
Description |
on(val) |
Arguments: Returns: |
Turns the LED on or off. |
toggle() |
Arguments: none Returns: |
Toggles the LED state between on and off. |
bright(val) |
Arguments: Returns: |
Sets the LED brightness. |
bright() |
Arguments: none Returns: |
Retrieves the current LED brightness level. |
color(color) |
Arguments: Returns: |
Sets the LED color. |
anim_bright, anim_play_bright |
Arguments: none Returns: none |
Refer to: Controls the LED brightness animation. |
7.14. Line
The Line widget inherits all methods from Table 5 and provides the following additional methods:
Method |
Arguments & Return |
Description |
color(color) |
Arguments: Return: None |
Sets the color of the line. |
mov_p(idx, x, y) |
Arguments: Return: None |
Moves the specified point to a new coordinate and updates the line drawing. |
set_p(idx, x, y) |
Arguments: Return: None |
Sets the coordinate of a specific point without updating the line drawing. To apply the changes, call the |
refresh() |
Arguments: None Return: None |
Refreshes the line drawing to reflect any changes made to its points. |
7.15. Panel
The Panel widget inherits all methods from Table 5.
7.16. QRCode
The QRCode widget inherits all methods from Table 5 and provides the following additional methods:
| Method | Arguments & Return | Description |
|---|---|---|
|
Arguments: Returns: None |
Updates the QRCode to display a new string. |
7.17. Roller
The Roller widget inherits all methods from Table 5 and provides the following additional methods:
| Method | Arguments & Return | Description |
|---|---|---|
options(str, [mode=0]) |
Arguments: Return: none |
Sets the roller options. |
options() |
Arguments: none Return: <String>, options string |
Retrieves the options string. |
selected(pos, [anim=0]) |
Arguments: Return: none |
Sets the selected position. |
selected() |
Arguments: none Return: <Number>, selected position |
Retrieves the selected position. |
selected_str() |
Arguments: none Return: <String>, selected item string |
Retrieves the string of the selected item. |
7.18. Slider
The Slider widget inherits all methods from Table 5 and includes the following additional methods:
Method |
Arguments & Return |
Description |
val(val, [anim=0]) |
Arguments: Return: none |
Sets the slider’s value. |
val() |
Arguments: none Return: <Number>, the current value of the slider |
Retrieves the slider’s current value. |
left_val(val, [anim=0]) |
Arguments: Return: none |
Sets the left value of the slider. |
left_val() |
Arguments: none Return: <Number>, the current left value of the slider |
Retrieves the slider’s current left value. |
range(min, max) |
Arguments: Return: none |
Sets the range of the slider. |
range() |
Arguments: none Return: <String>, the range in the format |
Retrieves the slider’s range as a string. |
anim_val |
Reference: |
Refers to the animation properties of the widget. |
7.19. Switch
The Switch widget inherits all methods from Table 5 and provides the following additional methods:
| Method | Arguments & Return | Description |
|---|---|---|
checked(val) |
Arguments: Return: None |
Sets the switch’s check status. |
checked() |
Arguments: None Return: <Number>, 0 for checked, 1 for unchecked |
Retrieves the switch’s current check status. |
7.20. Textarea
The Textarea widget inherits all methods from Table 5 and provides the following additional methods:
Method |
Arguments & Return |
Description |
text(val) |
Arguments: Returns: none |
Sets the text of the Textarea. |
text() |
Arguments: none Returns: <String>, the current text. |
Retrieves the text of the Textarea. |
add_text(var) |
Arguments: Returns: none |
Appends the specified string or number to the Textarea. |
del_char(forward) |
Arguments: Returns: none |
Deletes a character in the Textarea based on the specified direction. |
cursor_pos(pos) |
Arguments: Returns: none |
Sets the cursor position in the Textarea. |
cursor_move(dir) |
Arguments: Returns: none |
Moves the cursor in the specified direction. |
8. SD Card
The BunHMI device includes a single SD card slot, which can be accessed using BunTalk. BunHMI utilizes the LVGL filesystem library to interact with the SD card. Most of the APIs are similar to those provided by the LVGL filesystem.
8.1. File Descriptor
Due to resource constraints, BunHMI allows only a limited number of file descriptors. Currently, you can open a maximum of 4 files simultaneously. If you need to access another file, one of the previously opened files will be automatically closed.
8.2. API in the sys Object
The SD card API is included in the sys object. You can invoke file system APIs as shown below:
/* Print directory content */
ptr(sys.f_dir(""));

/* Open a file */
sys.f_open(0, "/test2.txt", 1);
This example opens the SD card file "/test2.txt" in write mode and assigns it to file descriptor 0.
| Method | Arguments & Return Value | Description |
|---|---|---|
f_dir(path, [offset=0], [cnt=0]) |
Arguments: Return: <String>, directory listing. The maximum string length is 512 bytes. |
Lists the contents of a directory. For example: /image\n Entries starting with "/" indicate directories. If the directory content exceeds 256 bytes, the result will be truncated with "…" at the end, like: /image\n You can use |
f_open(fil_id, full_name, mode) |
Arguments: Return: <Number>, result code from the LVGL file system. |
Opens a file. After opening, the file can be accessed using the specified |
f_close(fil_id) |
Arguments: Return: None |
Closes an open file. If the file has been modified, the cached data will be written back to the SD card. After closing, the |
f_gets(fil_id, max_len) |
Arguments: Return: <String> |
Reads a string from the file. If an error occurs or the end of the file (EOF) is reached, it returns |
f_lseek(fil_id, pos) |
Arguments: Return: <Number> |
Sets the file pointer to the specified position. |
f_puts(fil_id, string) |
Arguments: Return: <Number>, number of bytes written. |
Writes a string to the file. |
f_reads(fil_id, max_len) |
Arguments: Return: <String> |
Reads data from the file. The return string includes a two-character prefix:
For example:
- Successful read: This method helps identify whether the EOF has been reached or if the file is empty. |
f_size(fil_id) |
Arguments: Return: <Number>, file size in bytes. |
Returns the size of the file. |
f_skips(fil_id, nline) |
Arguments: Return: <Number>, number of lines actually skipped. |
Skips the specified number of lines while reading a file. The return value indicates the actual number of lines skipped, which may be less than |
f_tell(fil_id) |
Arguments: Return: <Number> |
Returns the current file pointer position. |
9. Real-Time Clock (RTC)
The Real-Time Clock (RTC) controller provides real-time clock and calendar information. (This feature is only available on models equipped with an RTC.)
9.1. RTC API in the sys Object
The RTC API is included in the sys object, allowing you to invoke RTC-related functions as follows:
/* Set the current time to 2020-12-31 23:30:00 */
sys.rtc(2020, 12, 31, 23, 30, 0);
9.2. RTC API Methods
| Method | Arguments & Return Value | Description |
|---|---|---|
|
Arguments: Return Value: None |
Sets the current time of the RTC. |
|
Arguments: Return Value: <Number>: The value of the specified RTC field |
Retrieves the value of a specific RTC field (e.g., year, month, day, hour, minute, second). |
|
Arguments: Return Value: <String>: A formatted string representing the RTC time |
Generates a formatted string representing the RTC time. |
10. WAV File Playback
BunHMI supports WAV file playback. This feature is only available on HMI models equipped with audio output capabilities. The default source for WAV files is the SD card. The supported WAV file formats are:
-
Channels: Mono (1) or Stereo (2)
-
Sampling bits: 8, 16, or 24 bits
10.1. API in the sys Object
The WAV playback API is included in the sys object. You can invoke the WAV playback API as follows:
/* Start playing "audio.wav". For simplicity, use only the main file name without the ".wav" extension. */
sys.wav_play("audio"); // Note: Do not include the ".wav" extension.
/* BunHMI also supports WAV playlists using the following methods: */
/* Note: Playlist functionality is not supported on all BunHMI models. */
sys.wav_drv(0); // Set the WAV file source to the SD card.
sys.wav_clr();  // Clear the playlist.
sys.wav_add("music1", "music2"); // Add files to the playlist.
sys.wav_add("music3");
sys.wav_play(""); // Start playing "music1.wav" -> "music2.wav" -> "music3.wav" sequentially.
10.2. API Methods
| Method | Arguments & Return Value | Description |
|---|---|---|
|
Arguments: Return: None |
Adds files to the WAV playlist. |
|
Arguments: None Return: None |
Clears the WAV playlist. |
|
Arguments: None Return: |
Retrieves the current playback time of the WAV file. |
|
Arguments:
Return: None |
Selects the source drive for WAV files. This method is only available on HMI models with multiple storage options. |
|
Arguments: None Return: |
Retrieves the duration of the current WAV file. |
|
Arguments:
Return: None |
Mutes or unmutes the audio output. |
|
Arguments:
Return: None |
Pauses or resumes WAV playback. |
|
Arguments:
Return:
|
Opens and plays a WAV file.
If the To set the audio volume at the beginning, set When a WAV file reaches the end or encounters a read error, BunHMI will send the string |
|
Arguments: None Return: None |
Stops WAV playback. |
|
Arguments:
Return: None |
Sets the playback position of the WAV file. |
|
Arguments:
Return: None |
Sets the audio output volume. |
|
Arguments:
Return: None |
Sets the audio output volume for the left and right channels separately. |
|
Arguments: None Return: |
Retrieves the current audio output volume. |
11. Buntalk with Checksum
When using Buntalk communication, there is a possibility of bit errors occurring on the UART. To detect such errors, you can use a checksum mechanism.
11.1. Checksum Format
The checksum is calculated by summing all the characters in the Buntalk script, taking the modulo of the sum by 0xFF, and appending the resulting two hexadecimal digits to the end of the script.
When using the checksum format, you must append <ETB>(17h) at the end of the command string instead of <EOT>(04h). The BunHMI system will check the last byte of the script. If the last byte is <ETB>(17h), the system will validate the script using the checksum.
For example, if you want to send the following command:
ptr("Hello");
You first calculate the sum of all characters:
70h + 74h + 72h + 28h + 22h + 48h + 65h + 6Ch + 6Ch + 6Fh + 22h + 29h + 3Bh = 41Ah
The modulo of 41Ah is 1Ah.
Thus, the command to send becomes:
ptr("Hello");1A<ETB>
If the checksum is incorrect, you will receive an error response message:
!!cksum err<EOT>
11.2. Printing with Checksum
When receiving a string from the UART with a checksum, you can use the ptk() function. Similar to ptr(), the ptk() function appends the two hexadecimal digits of the checksum to the end of the string.
For example, when executing the script:
ptk("Buntalk");
The sum of the characters in "Buntalk" is calculated as follows:
42h + 75h + 6Eh + 74h + 61h + 6Ch + 6Bh = 2D1h
The modulo of 2D1h is D1h. Therefore, the resulting string will be:
BuntalkD1<ETB>
To validate the checksum, you can first check the last byte. If the last byte is <ETB>(17h), the two characters preceding <ETB> represent the checksum.
12. Conclusion
This document provides an overview of BunHMI, BunTalk scripting, and the various features and widgets available. For further details, refer to the included documentation files or contact support at mcuidea@gmail.com.
Thank you for using BunHMI!